Al and Algorithms
In this toolbox exercise you will learn about the A star search algorithm that game AI often use to plan their paths. Ever wondered how your game avatar decides how to get from one point to another? Probably A star, or something very similar!
The goal of this toolbox is for you to familiarize yourself with and understand A star search, and then extend the algorithm and path planning code so that our game AI can make more complex moves and decisions.
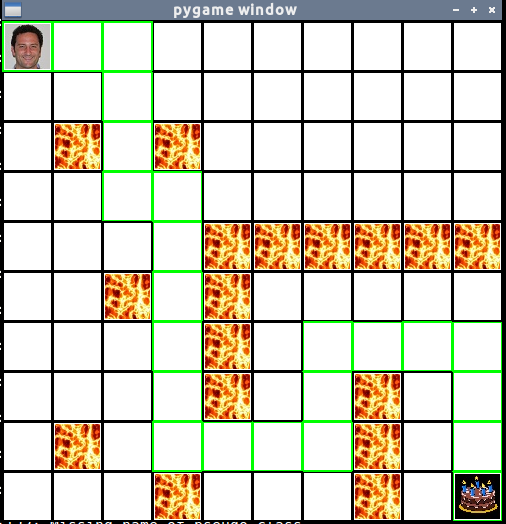
The game is simple: Paul wants cake, and he needs to find a way to get to the cake!
Thanks to Dennis Chen [2015 NINJA] for writing this toolbox.
Get Set
Before getting started, make sure you have pygame installed. The following apt-get line will install the pygame library.
$ sudo pip3 install pygame
Grab the A star search starter code via the normal fork-and-clone method from https://github.com//sd17spring/ToolBox-AI.
Learn about A star search
Read up on A star here and here. Do your best to understand what the pseudocode in the links mean. What are the advantages that A star has over breadth-first search? What advantages does A star have over depth-first search?
Using the GUI
To use the GUI/toy, first run python3 astar.py to bring up the pygame window.
Hit the ‘l’ key to switch to the ‘add lava tiles’ mode. Then you can click on
any cell to add or remove a lava tile from that cell. Hit the spacebar at any
time to have Paul plan (or re-plan) his path to the cake, and highlight that
path. Feel free to reach out at any time about problems, this code certainly
isn’t the most robust or well structured, so Dennis would be happy to explain
what the heck he was thinking to you.
Print those scores!
Take a look at lines 171-173 of the code. Try commenting and uncommenting
lines to set COST_TO_DRAW to different values, and run the code to see the
values that are printed in each cell when you hit the spacebar. Take a
screenshot (Fn + Print Scrn) of each example with some lava tiles placed down,
and in your own words, explain what f_score, g_score, and h_score are, and why
you see those specific values in the screenshot. (There should be three
screenshots, printing f values, g values, and h values).
Get coding!
For the following 3 sections, you should implement the code to get the specified behavior, but also place tiles and set up a scenario/path where that newly implemented behavior is demonstrated (ex. Paul moving diagonally or moving through a swamp.) Then include a screenshot and explanation. Quoting Paul, “Once you make a change, you should include a screenshot of the pygame window that shows the generated path for a given set of obstacles. You should be ready to explain why the shown path is actually the shortest (for instance… “the diagonal move while costly, is necessary in order to reach the goal, paths consisting of just up, down, left, or right would not be able to reach the goal”).”
Paul gets Diagonals
Read the get_open_adj_coords() function to get an idea of how valid adjacent
cells are found. In the current code, valid adjacent cells only include the
surrounding cells in the 4 cardinal directions, and moving to any of these
cells costs 1 movement point. Add code changing the get_open_adj_coords()
function so that surrounding diagonal cells are considered valid adjacent
cells and moving to any of these cells costs 3 movement points. This will
allow Paul to move diagonally.
Paul gets Hops
Evolve Paul and allow him to jump over lava! Add the ability for Paul to jump
one square. This should cost 8 movement points, however. This will involve
changing get_open_adj_coords().
Paul gets Swamped
Change the program so that pressing ‘s’ allows you to add swamp tiles. Paul
should be able to move through swamp tiles, but they will slow him down!
Moving into a swamp tile will cost 3 additional movement points, so Paul
should really avoid moving through swamp tiles unless he has to. Note that
this means that moving to an adjacent swamp tile will cost 4 points, since
moving adjacent one square costs 1 point, and the swamp adds 3. Moving into a
diagonal swamp tile will cost 6 points. A swamp.jpg file has been provided for
you in the /images folder. You will probably have to make some changes to
pygame’s main_loop to detect key presses, and you’ll have to implement the
empty _add_swamp() function. Take a look at _add_lava() for inspiration, and
note the terrain_cost and is_unpassable arguments that are passed to the
ObstacleTile constructor when a lava tile is made!
Completing the Toolbox Exercise
To turn in your assignment, push your code and screenshots to GitHub and submit a pull request.
