Get Set
Keep Calm and SoftDes On
Before we can get down to the business, we need to make sure we have the right tools for the job. If you follow these instructions (with help from our amazing NINJA team), your computer will be primed and ready to do some serious computational work.
Initially, the amount of new stuff here may seem intimidating. Please do not let this discourage you! We (NINJAs and faculty) will provide lots of help and guidance along the way to help you setup, and then gain comfort with your new toolset. The process will start at the end of the first class, and will continue with additional NINJA / faculty office hours to help you complete the process successfully. Additionally, you will gain familiarity and comfort with this toolset as the semester progresses. In other words, you should think of learning the toolset as a process and not something that you need to do all at once.
A note about variations on the instructions
The instructions below will allow you to setup the “officially supported” environment for SoftDes. Some deviations from the setup below are okay while others are not (when in doubt please ask). That being said, it will likely be more difficult for us to help you debug problems with your setup if you have a nonstandard environment.
A note about “$”
In these instructions we will use a “$” to indicate that a command should be
performed at the Linux command prompt. If a command is not preceded with a “$”
then it is understood that it is a Python statement (even without this marker,
the context should make it clear whether a command is a Linux command or a
Python command). For instance, we might instruct you to run the following
command.
$ ls ~
In this case you would open a Linux terminal and type the characters “ls ~”
and then hit the enter key (notice that you don’t actually type the “$” at any
time). If you don’t know what a Linux terminal is yet, that is okay! Keep
reading!
Step 1: Install and Configure Ubuntu
The officially supported OS for SoftDes is Ubuntu 16.04.1 64-bit (ISO available here). The preferred method for installation is to use one of the provided SoftDes thumb drives. These thumb drives have been pre-loaded with a bootable installer for Ubuntu 16.04.1. In order to go forward with the installation you need to insert the thumb drive, reboot your computer, and hold the F12 key before your computer starts to load Windows. You will now be at your computer’s BIOS menu. Use the arrow keys to select boot from “USB Storage Device”. If everything has gone properly, the Ubuntu installer will start. You may find IT’s instructions useful for completing the installation steps.
First-year laptops seem to have enough free space on the hard drive to install Linux, so you can just follow the default “Install Linux alongside Windows” instructions. If you have an older laptop or otherwise don’t have room for the Linux install, you will need to adjust your hard drive partition sizes to make room. Detailed instructions on how to complete the partitioning process can be found here. When in doubt ask for help as this part is a bit tricky.
Another option is to use a virtual machine. In this variant you will run Ubuntu inside of a window inside of the Windows operating system (or Mac OS X if that is what you have). We will also have thumb drives on hand that can be used to install Ubuntu as a virtual machine. We recommend the freely available program Virtual Box if you are running a VM. Ask for help if you find you need help on setting this up.
The steps that are most important are:
- Configure apt
- Install the proprietary NVIDIA driver
- Enable your firewall
- Configure wireless
You can set up the other things later if you want to.
Once everything is configured, execute the following commands at the Linux terminal:
$ sudo add-apt-repository ppa:webupd8team/atom
$ sudo apt-get update
$ sudo apt-get upgrade
Next, install some additional Python packages using the following commands:
$ sudo apt-get install -y python python-pip python-tk python-dev git build-essential
$ sudo apt-get install -y python3 python3-pip python3-tk python3-dev
Note, that the preceding command installs these key pieces of software:
gitis the version control system we will use this semester.python3-pipis a Python package installer.python3-tkis a GUI toolkit for Python.python-pipandpython-tkare the package installers and GUI for Python 2. We won’t be coding in Python 2 in this course, but we may use it to run student projects from previous years.
Next, we’ll install Jupyter notebook which you’ll be using for pre-class exercises:
$ pip3 install --upgrade pip
$ sudo pip3 install jupyter
We’ll be using Atom as default text editor for the course. Go ahead and install it:
$ sudo apt-get install atom
To verify that Python 3 is installed, run:
$ python3
Then type the following at the Python prompt:
>>> import turtle
>>> turtle.Turtle()
>>> quit()
Notes:
- Don’t type the
>>>. (>>>is to Python as$is to bash.) - The
turtle.Turtle()line will cause a white window to appear in front of the terminal window. Since you’ll need to switch back to the terminal window to continue interacting with the Python prompt, you can close the white window.
To verify that Atom is installed, run:
$ atom
Optional: Set Up Your Integrated Development Environment (IDE)
You’ve now got all you need to start editing code with Atom, but you may want your development environment to be a little fancier. Beyond a simple text editor, an IDE also contains a suite of tools that will help you debug while you code instead of discovering the errors at runtime.
Certain trivial but frequent errors (incorrect indentation, certain misspelled names) can be detected earlier. We’ll transform Atom into a pseudo-IDE by installing some development tools that let you see these errors in the editor as you type.
$ sudo pip3 install pyflakes jedi flake8 isort
$ apm install Hydrogen atom-beautify autocomplete autocomplete-python script
$ apm install linter linter-flake8 python-indent python-isort python-tools trailing-spaces
[script was added to the instructions above on 2017-01-29.
If you followed these instructions before that date, you need to run
apm install script to get it.]
If you prefer to use Sublime Text, install a plugin manager (Package Control) using these instructions, and install the Anaconda plugin using these instructions. This plugin can also provide additional programming aids; for more information, see the Anaconda web site.
Step 2: Learn About Linux
Read Chapter 1 of Linux at Olin (available here).
Step 3: Get Started with Git
The Basic Idea
We will make heavy use of Git (and GitHub in this class). Haven’t heard of Git? That’s totally fine (and totally expected)! Before we do some course specific Git stuff, take some time to read Chapter 1 of Allen’s excellent online book called AmGit.
Create a GitHub Account
Now that you have the basic idea of what version control is and what it is good for, you are going to take the next step and sign up for an account on a website called GitHub. The second chapter of Allen’s book has a nice description of GitHub, and how to make an account.
GitHub is a web-based hosting service for Git users. In general a hosting service provides storage space on remote servers, network access, and tools and applications for interacting with stored data. GitHub provides storage for Git repositories and tools for interacting with them.
There are other hosting services for Git, but GitHub is one of the most popular. It is so popular that people sometimes say “GitHub” when they mean “Git”, so just to be clear:
- Git is an application that runs on your computer and helps you manage repositories.
- You can use Git to manage repos stored on your own computer or on any computer configured as a Git server.
- Anybody can set up and run a Git server. A company that runs Git servers professionally is a Git hosting service.
- GitHub is one of many Git hosting services.
Ok, go to https://github.com. If you already have an account, log in. Otherwise, you will have to create one.
You can choose any available username you like, but there are a few things you might want to think about:
- Working on GitHub involves interacting with other people. They will see your username, so choose wisely.
- Some people, like
AllenDowney, use their full names, but the most common schema seems to be one-word lower-case usernames. For example, Scott Chacon isschacon.- If you want to be anonymous, you can choose a username unrelated to your real name; however,
- Many software engineers use GitHub as part of their professional portfolio. If a potential employer wants to check out your skills, they might look at your GitHub repositories.
It is probably a good idea to think of everything you do on GitHub as part of your public professional reputation.
Find and Fork the ReadingJournal Repo
We will be using GitHub for a number of use cases in the class.
- Turning in pre-class reading exercises
- Turning in mini-projects
- Distributing materials for in-class exercises
Since there’s reading due next class, you will need to perform the steps below
to setup your personal ReadingJournal repository.
Navigate to the SoftDes reading journal base repository by clicking on this link. Next, click the “Fork” button in the upper right hand corner of the page. If you are not signed into GitHub, you will be prompted to sign in. Read on for instructions on downloading and then turning in your reading exercises.
Step 4: Do Some Reading (and write Some Python)!
Now that you’ve created a fork of the ReadingJournal repo, you should clone it
to your desktop. In the web browser window that you used to fork the base
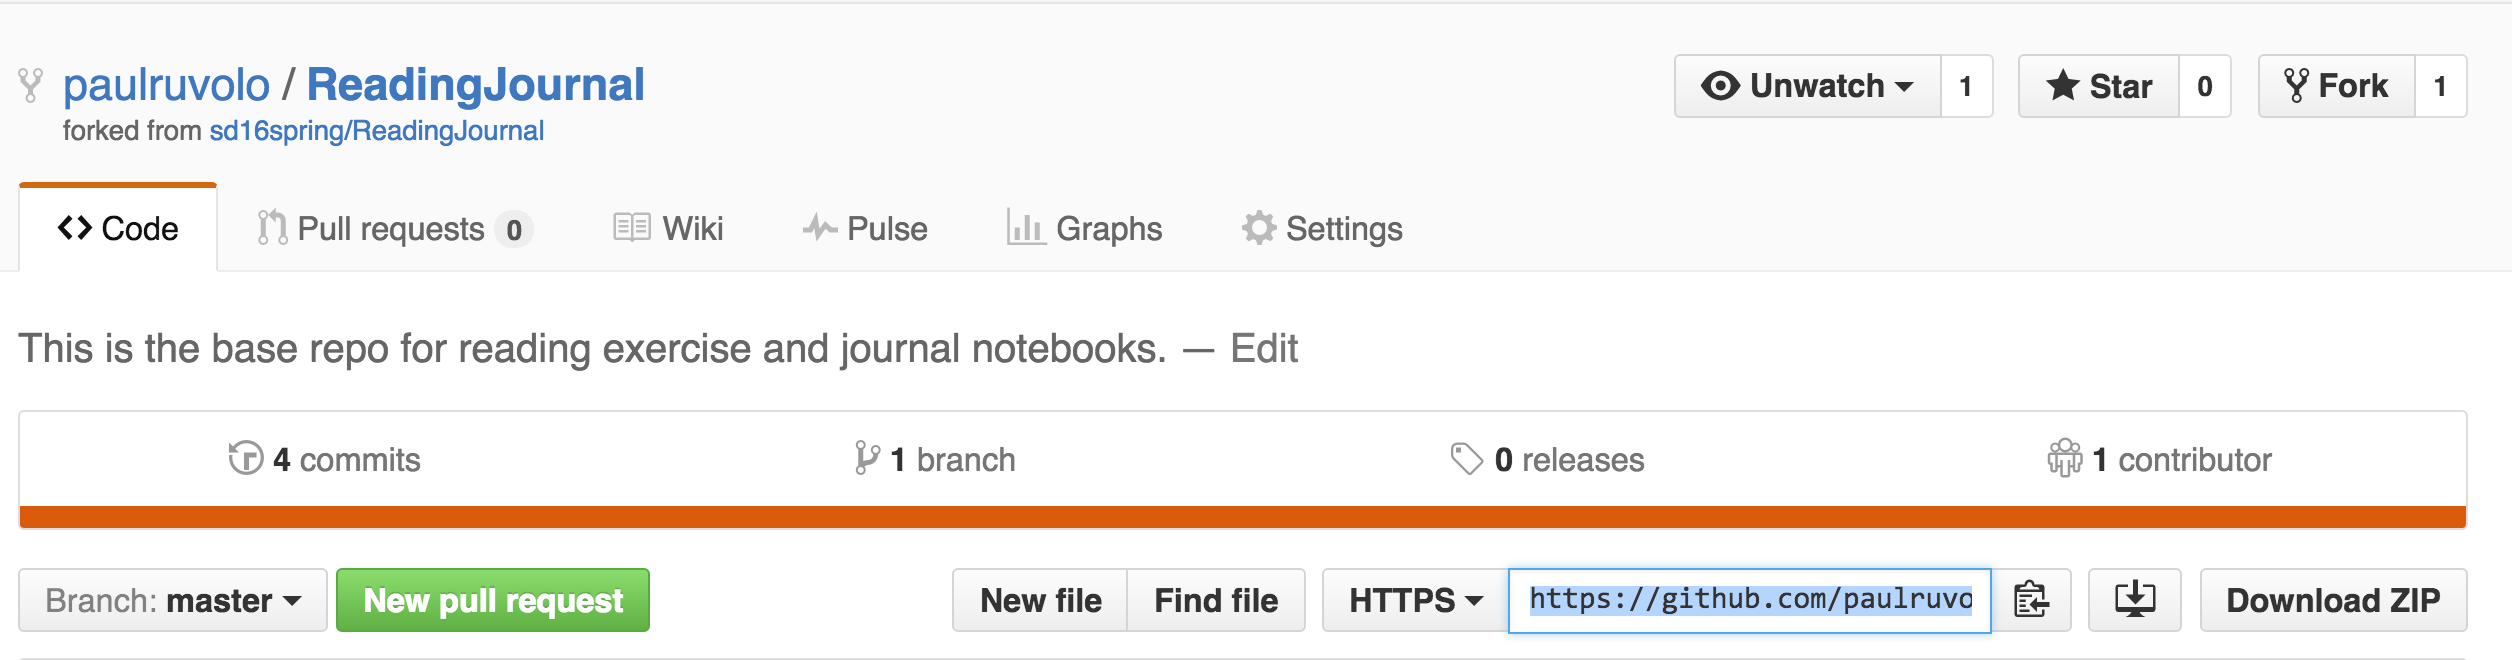
repo, copy the URL that points to your fork of that repo. For Paul, the URL
looks like this: https://github.com/paulruvolo/ReadingJournal.git. He got this
link by copying the highlighted text in the screenshot below.
Next, open up a terminal and clone the repo by running the following command (be sure to replace the pointer to Paul’s ReadingJournal with your own!). These instructions assume that you want to put the Reading Journal in your home directory. If not, make sure to modify the first line to change to the directory where you want your reading journal to reside.
$ cd ~
$ git clone https://github.com/paulruvolo/ReadingJournal.git
Next, you can fire up Jupyter notebook and load the reading journal for today.
$ cd ~/ReadingJournal
$ jupyter notebook day1_reading_journal.ipynb
If all goes well, this should bring up a web browser with the reading questions as well as an Jupyter notebook you can use for taking your own notes on the reading.
Once you have completed your reading journal (not just the reading exercises, but also your notes as well as any comments you want to give to us), you can turn in your work by running the following commands:
$ cd ~/ReadingJournal
$ git add day1_reading_journal.ipynb
$ git commit -m "Turning in my reading journal for day 1"
$ git push
You will then be prompted to enter your GitHub username and password. Assuming you followed all of the instructions outlined above, that’s it!
Note: just for this time, there is one last step to turning in your reading assignment. This additional step will happen when you fill out the course entrance survey (see below).
Contingency Plan if You Are Having Problems With Your Setup
If you are having trouble getting your environment setup for whatever reason, please do the following:
- Tell us about it immediately! The teaching team (NINJAs and faculty) can help you (the best way to contact the whole teaching team is through Piazza).
- Don’t fall behind on the reading in ThinkPython. In order to make sure this doesn’t happen, we have put up a hosted version of the Jupyter journal notebooks. You can access it here. Please note that your work will not be saved on the sever as you fill the notebook out. If you want to get a snapshot of your work, it is important to download the notebook file to your computer (the download command is under the file menu). It’s probably best to think of this as a scratch pad, and not as the sole place to store your work.
Step 5: Play a game?!?
President Obama made headlines for being the first U.S. president to write a line of code. The code he wrote was part of the “Hour of Code” initiative which seeks to get more people to try programming. There are many different hour of code tutorials, but a really fun one is called LightBot. Go ahead and try it out! While LightBot might seem trivial at first (the first few levels pretty much are that), we think it provides an interesting jumping off point for some interesting discussions regarding how to approach computational problems (the first section called “Basics” is very easy, so please make sure to try out a few of the “Procedures” levels as well). Here are some things you might want to ponder as you play the game:
- What processes do you go through to craft your first attempt at a level?
- If your attempt is unsuccessful, how did you go about fixing it?
- Did your approach to the previous two events change as you got more experience playing the game?
- Any other interesting observations?
Tell Us More About Yourself!
As a final step for both turning in your reading journal, and so that we can learn more about you, your background, and your learning goals, please fill out the course entrance survey.